Original Link: https://www.anandtech.com/show/2494
Amacrox Calmer 560: Silence is Golden
by Christoph Katzer on April 2, 2008 12:00 AM EST- Posted in
- Cases/Cooling/PSUs
Introduction
Amacrox might be not a familiar name to everyone, but the company just expanded its business over in Europe and should soon spread to the US as well. Most people in the PSU market know that Amacrox is actually a brand of the FSP group, which is the third largest power supply manufacturer worldwide. With Amacrox, the people at FSP wanted to create a brand that is actually "hip", whereas FSP is the more conservative brand. We already tested the Freestyle 750W in one of our roundups last year and found it performed quite well… until it failed. That certainly mars the impression, so we're here to look at a different PSU to find out if Amacrox can convey their message better this time..
With the Calmer 560, Amacrox has a fanless power supply with a 400W output. In 2006, we saw the Calmer and found it had very good efficiency and stable rails. Today we will be looking at the advanced model and hope that it can stick up to its predecessor. The Calmer 560 comes rated at 400W, but it has a peak output of 560W; hence the name. We will see in our tests if we can run safely at higher outputs and if the power supply can still deliver stable outputs at that level. The target market of this power supply is surely not enthusiasts with high-end graphics cards or SLI, but with 400W one can fire up most midrange systems with a dual-core CPU, a few hard drives, and a graphics cards with a single 6-pin PEG connector. Those looking to build a truly silent system should definitely have a look at this unit and our test results.
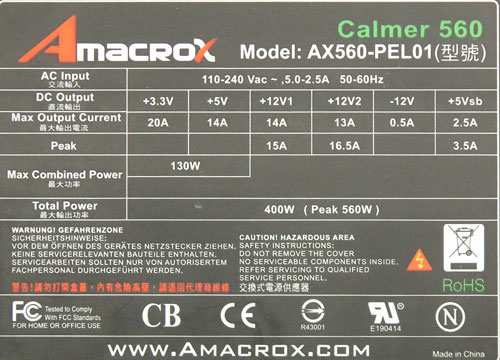
The label shows just 20A on the 3.3V rail and 14A on the 5V rail. Together they have a combined power of 130W, which will be definitely enough. This unit has two 12V rails, both rated at 14A. However, the second 12V rail has a higher peak output of 16.5A while the first has a peak output of 15A. Unfortunately, maximum combined power of the 12V rails is not listed, so we had to guess for our load calculations and settled on 300W.
Note: If you would like to know more about our testing methodology, equipment, and environment, please read our PSU testing overview.
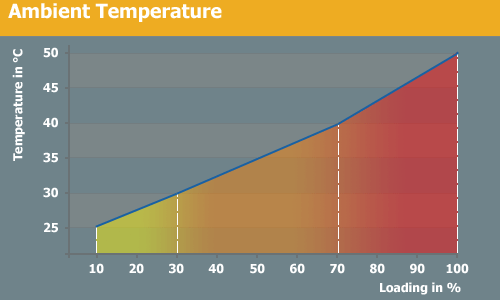
We test an additional 10% above the highest load to see how the units perform with overload, both at room temperature and in a more stressful situation. To keep things somewhat reasonable we keep the ambient temperature at 50°C during the stress overload testing. Experience shows that many units can stand the overload at room temperature but will show problems with higher temperature and overload together. Only the best units will manage this without problems.
Package and Appearance
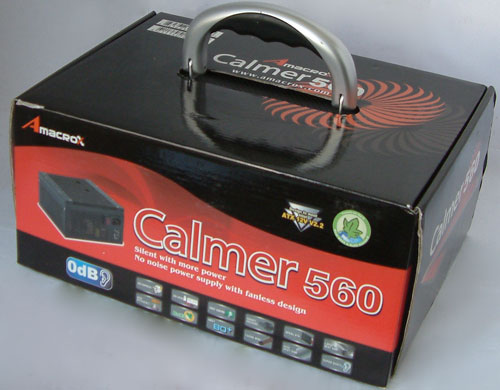
The power supply comes in a very uncommon large box with a metal handle on top. Once the paper shell is removed, we find a very nice steel case.
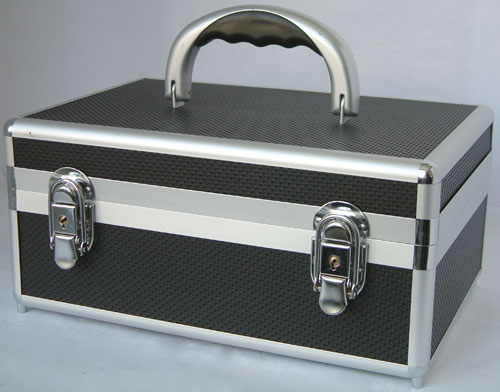
The power supply ships in this steel case for protection during shipping. After installation, the case can of course be used for other purposes. The quality of the case is decent and it shouldn't break under normal use. This is a great marketing idea: you can get a new PSU and give your wife a nice gift as well! (Ed: Perhaps some kitchen appliances for her birthday as well?)
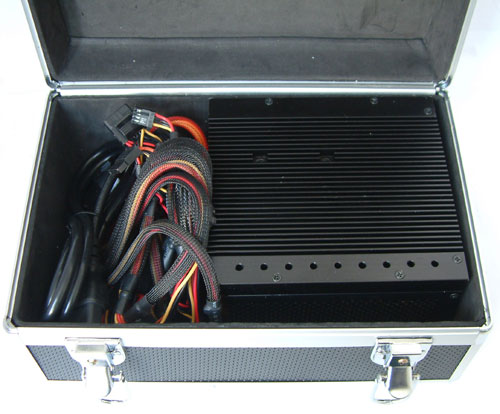
Opening the case, we find finally the power supply itself with its accessories. There is not much to see: just the power cord, screws, and a manual.
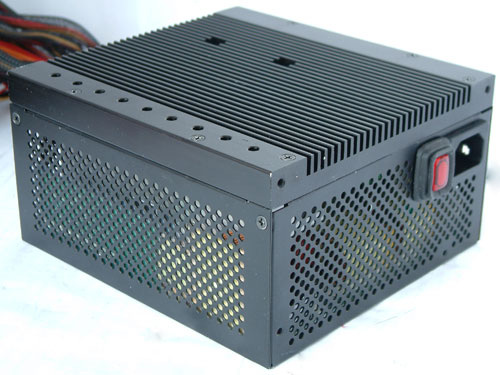
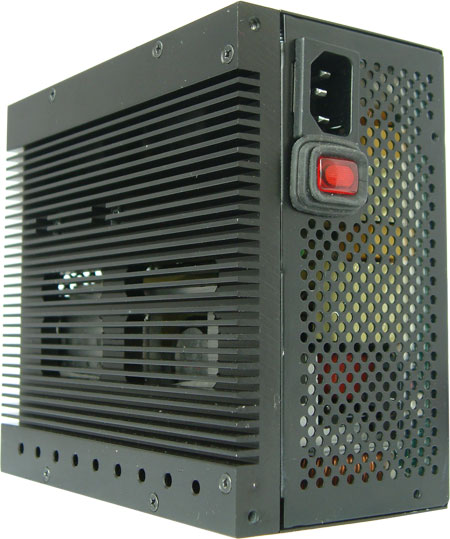
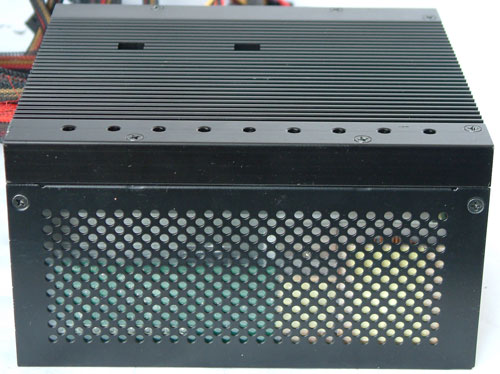
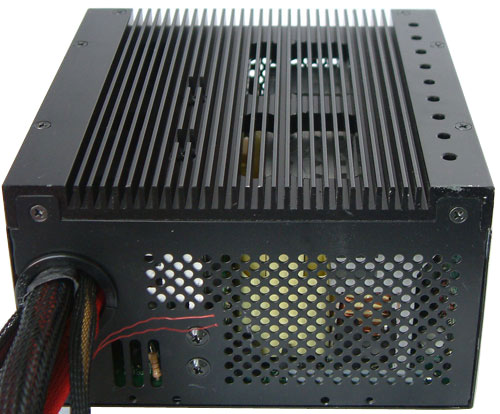
The power supply is black and has a very thick heatsink as the top of the casing (or bottom after installation in most cases). The extruded fins are easily recognized. Antec was the first to use this kind of design with the legendary Phantom power supply a few years ago. A heatsink of this size in theory should be able to dissipate the heat from inside the PSU into the surrounding air. There is no fan installed, making this power supply totally silent. The sides are perforated but partially blocked with a transparent plastic cover to prevent the internal parts from coming into contact with the metallic casing.
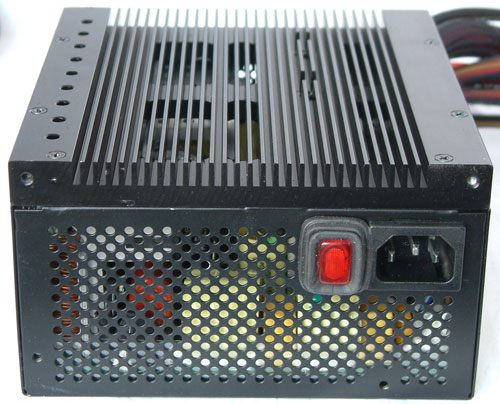
The power switch on the back of the power supply is somewhat unusual, but it serves the standard purpose. You can also see heatsink and the openings above the inner heatsink and main capacitor.
Cables and Connectors
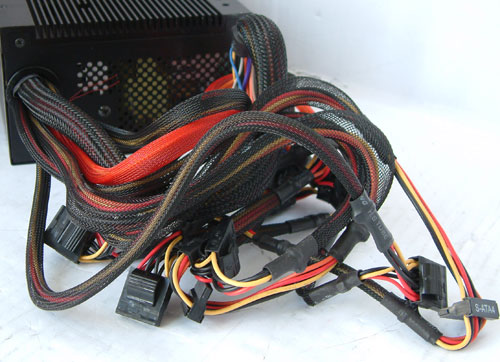
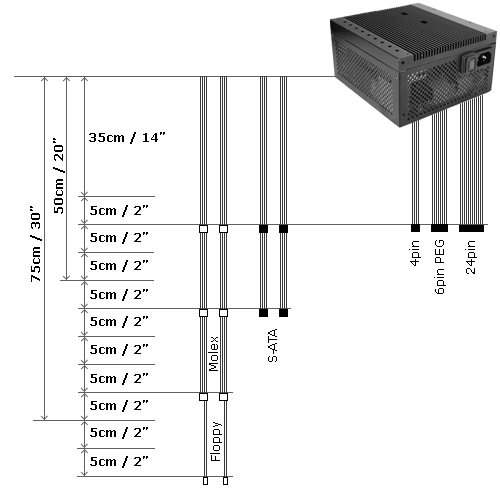
All of the harnesses are sleeved up to the last connector. The harness of the 6-pin PEG connector has an orange sleeve to make it recognizable. The cables are not very long, with a minimum length of 40cm or 16 inches. The 24-pin ATX, 4-pin ATX12V, and 6-pin PEG connectors are at this length, as well as the first SATA and Molex connectors.
Internals
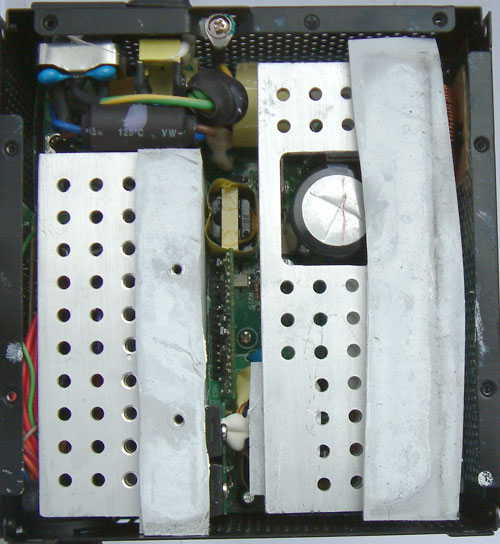
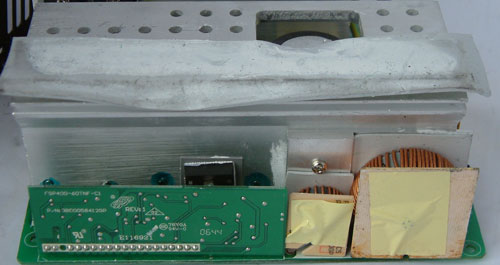
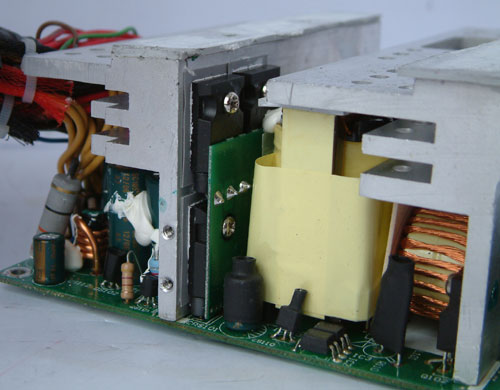
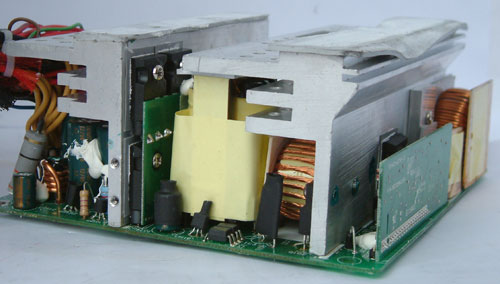
Opening this unit was quite difficult because there are more screws to remove before we can take off the top mounted heatsink. The inner heatsinks connect to the top heatsink with a heat conducting material that is quite adhesive and makes it difficult to remove the heatsink. Lifting it up with a screwdriver finally reveals the inside of the power supply. Since the other sides still block the view, we took it out of the case. The manufacturer uses large heatsinks inside to hold and help dissipate the generated heat. Small holes in the heatsinks allow some air to pass through, though obviously the airflow would have to come from system fans.
Above is part of the incoming filtering stage and it has all the necessary components. The other part of the filtering is located on a small sister PCB that is connected to the case.
Internals Continued
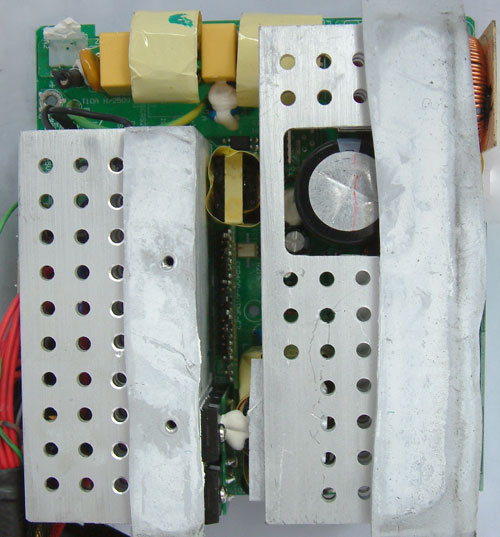
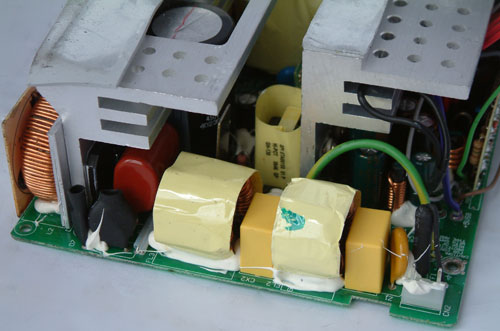
The two coils on the right of the primary side are actually mounted on small PCBs and not directly on the main PCB. There is a heat conducting tape between the coils and the heatsink behind them to transfer the generated heat from the coil directly to the heatsink. The larger PCB on the left side contains the PFC control.
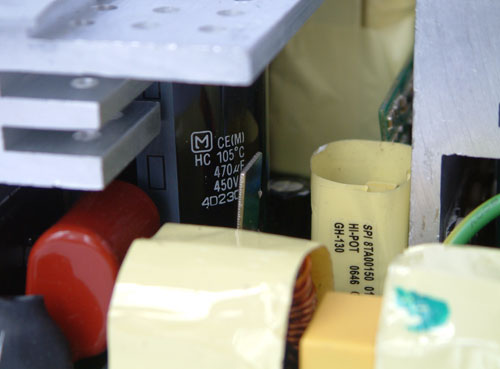
The main capacitor is rated at 105°C, which is obviously necessary since there is no fan to cool this part down. The capacitor comes from Panasonic rated at 470µF with 450V.
Things look quite cramped in this design, although with a lack of airflow all of the extra heatsinks and heat transfer surfaces make sense. The idea is to get all the heat conducting to external surfaces that should have some airflow from the rest of the system.
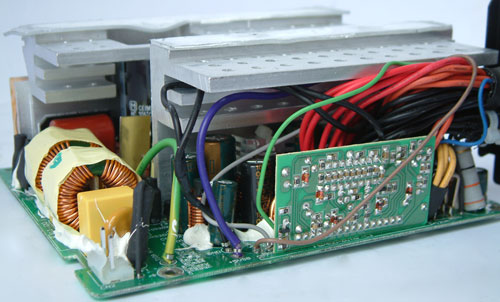
The secondary side features some Teapo and Ostor capacitors, all rated at 105° again since it will be somewhat hot inside the PSU.
Loads
As the results will show, there was no need to try for the peak 560W since the rails already experience problems at 110% of load - around 420W. It is possible to reach 560W, but we measured only around 3V at that time on the 3.3V rail and felt it wasn't worth showing. We decided to stay with the rated 400W and just went with a 10% overload, where the fanless design already struggled.
| Amacrox 560W Testing | |||||
| Load | 3.3V | 5V | 12V1 | 12V2 | Wattage All Rails |
| 10% | 1.70A | 1.19A | 1.15A | 1.07A | 40W |
| 20% | 3.40A | 2.38A | 2.30A | 2.14A | 80W |
| 50% | 8.50A | 5.95A | 5.76A | 5.35A | 195W |
| 80% | 13.59A | 9.52A | 9.22A | 8.56A | 310W |
| 100% | 16.99A | 11.90A | 11.52A | 10.70A | 390W |
| 110% | 18.69A | 13.08A | 12.67A | 11.77A | 420W |
As always, we used our Chroma ATE to apply a specific amount of load to all of the rails. The table above shows the different loads we used during testing.
DC Outputs
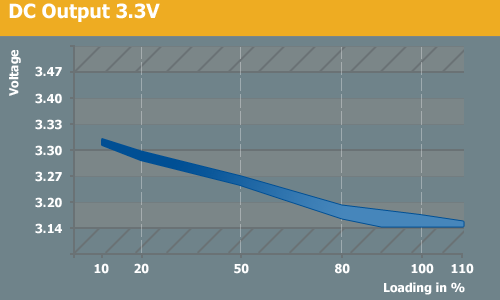
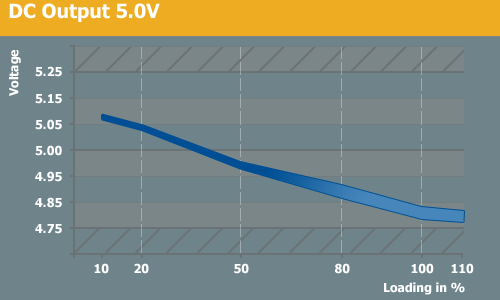
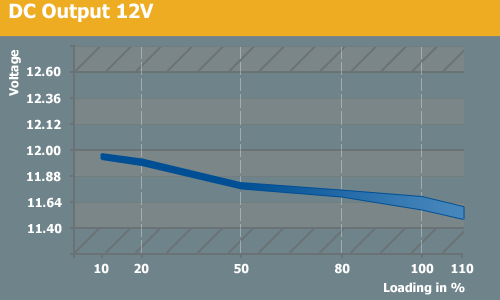
All of the rails start at their ideal output, which is good but doesn't leave much space for voltage drop with increasing loads. Normally we see power supplies start well above their nominal output, which leaves some wiggle room. This means that when we apply a heavy load the voltages drop dangerously close to being out of spec - and in the case of the 3.3V rail it falls out of spec above a 90% load. This is not a very good result if you actually plan on coming anywhere near the 400W rating, though the 12V and 5V rails do stay in spec even up to 10% overload. We also tried for the promised peak of 560W. Since the rails were already low, the extra load didn't help. We measured only 3V on the 3.3V rail at 560W.
Efficiency and Temperatures
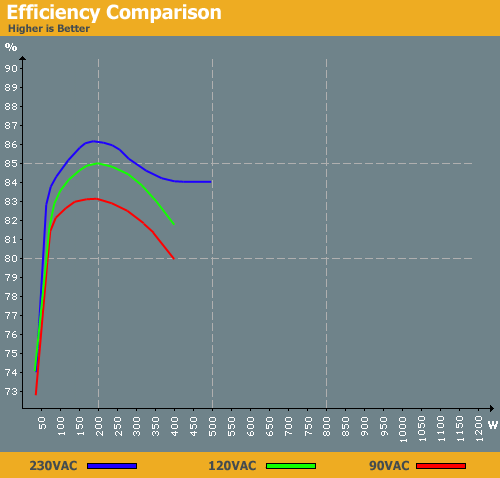
The graph above shows the actual efficiency at the specific wattage output of the unit. With 230VAC the efficiency is higher as usual, reaching slightly more than 86% at around a 190W load. The 85% efficiency at the same load is also fine for users in the US. We would not plan to load this power supply with more than ~200W anyway, since the voltages begin to drop beyond that point. Since we have only few connectors, though, most users won't connect enough components to pull higher wattages.
Unfortunately, all of our thermometers are broken right now, so we can only provide a subjective analysis. Throughout the test, the unit wasn't much more than hand-warm and only rose with higher loads and increasing room temperature. It was never reaching a hot state in which we wouldn't touch it anymore with bare hands. We expect some of the internal temperatures were higher, of course. The Calmer 560 didn't produce any acoustic noise at any time of the test, making this a completely silent power supply.
Conclusion
The Amacrox Calmer 560 targets a specific group of users. The 400W output is enough for most midrange and lower systems, but potential buyers should be aware that it only includes a 4-pin ATX12V connector for the CPU and not the 8-pin some boards desire, and there's only a single 6-pin PEG connector. That's enough to support midrange to high-end graphics cards with current GPUs. Given that this is a fanless PSU, we expect most users will be going for a lower end fanless GPU as well, so the lack of multiple PEG connections shouldn't cause any difficulties. In short, this power supply is a great fit for HTPCs, quiet office systems, or PCs that happen to be located in bedrooms.
The cable harnesses are very short, which again limits the versatility of this unit. It will definitely not work in a full-size tower, since the cables are not long enough to reach the different motherboard jacks, let alone the HDDs and DVDs. However, the Calmer 560 is a standard ATX size, so it can mount in smaller midsize and mATX cases without difficulty. For an HTPC or small mATX setup, of course, the shorter cables should be a perfect match. Just make sure the case can handle a heavy PSU, as this unit weighs around 4kg/8 lbs.
The performance is average at best, with quite a bit of voltage drop at higher loads. Most of the rails - including the important 12V rails - stay within specs even with 10% overload, so it should be adequate. The efficiency is very good and stays above 80% at most loads and input voltages. With a maximum of 86% using 230VAC, the Calmer 560 won't waste a lot of power, but optimal efficiency requires a load of ~100W or more. The high efficiency is important considering the fanless design; you definitely don't want to have to deal with any extra heat.
Amacrox PSUs are not yet available in the US, but the company is working to change the situation. In Europe, Amacrox is already a recognized brand that's available at most online stores. The price of around 150 EUR is quite steep considering the specifications; many competing power supplies offer virtually silent operation using a low RPM fan for half the cost of the Calmer 560. In the US this price would be more than $230, which is definitely too much for this product.
The price is too high for us to recommend this power supply, and fanless can be a bit of a concern in actual practice. Sure, a fanless PSU might be fine, provided you have at least one decent case fan; or maybe a fanless GPU with other low-RPM case fans. Removing all the fans in a modern PC, though? You'll want to be very careful if you try that approach. Still, we know there are people out there who want nothing other than pure silence, and that is what they get with the Amacrox Calmer 560. We recommend staying at loads closer to 200W rather than pushing for the 400W rating of this PSU, but then it's quite difficult to get silence on a 400W system anyway.


